TL;DR & Reference
New Project
mkdir project
cd project
platformio init --ide clion --board d1_mini
sed -i -e'/<component name="RunManager"/a     <configuration default="false" name="Debug" type="CMakeRunConfiguration" factoryName="Application" singleton="true" PROGRAM_PARAMS="serialports monitor -b 115200" PASS_PARENT_ENVS_2="true" PROJECT_NAME="project" TARGET_NAME="PLATFORMIO_UPLOAD" CONFIG_NAME="Debug" RUN_PATH="/usr/local/bin/platformio">\n      <envs />\n      <method />\n    </configuration>' .idea/workspace.xml
touch src/main.cpp
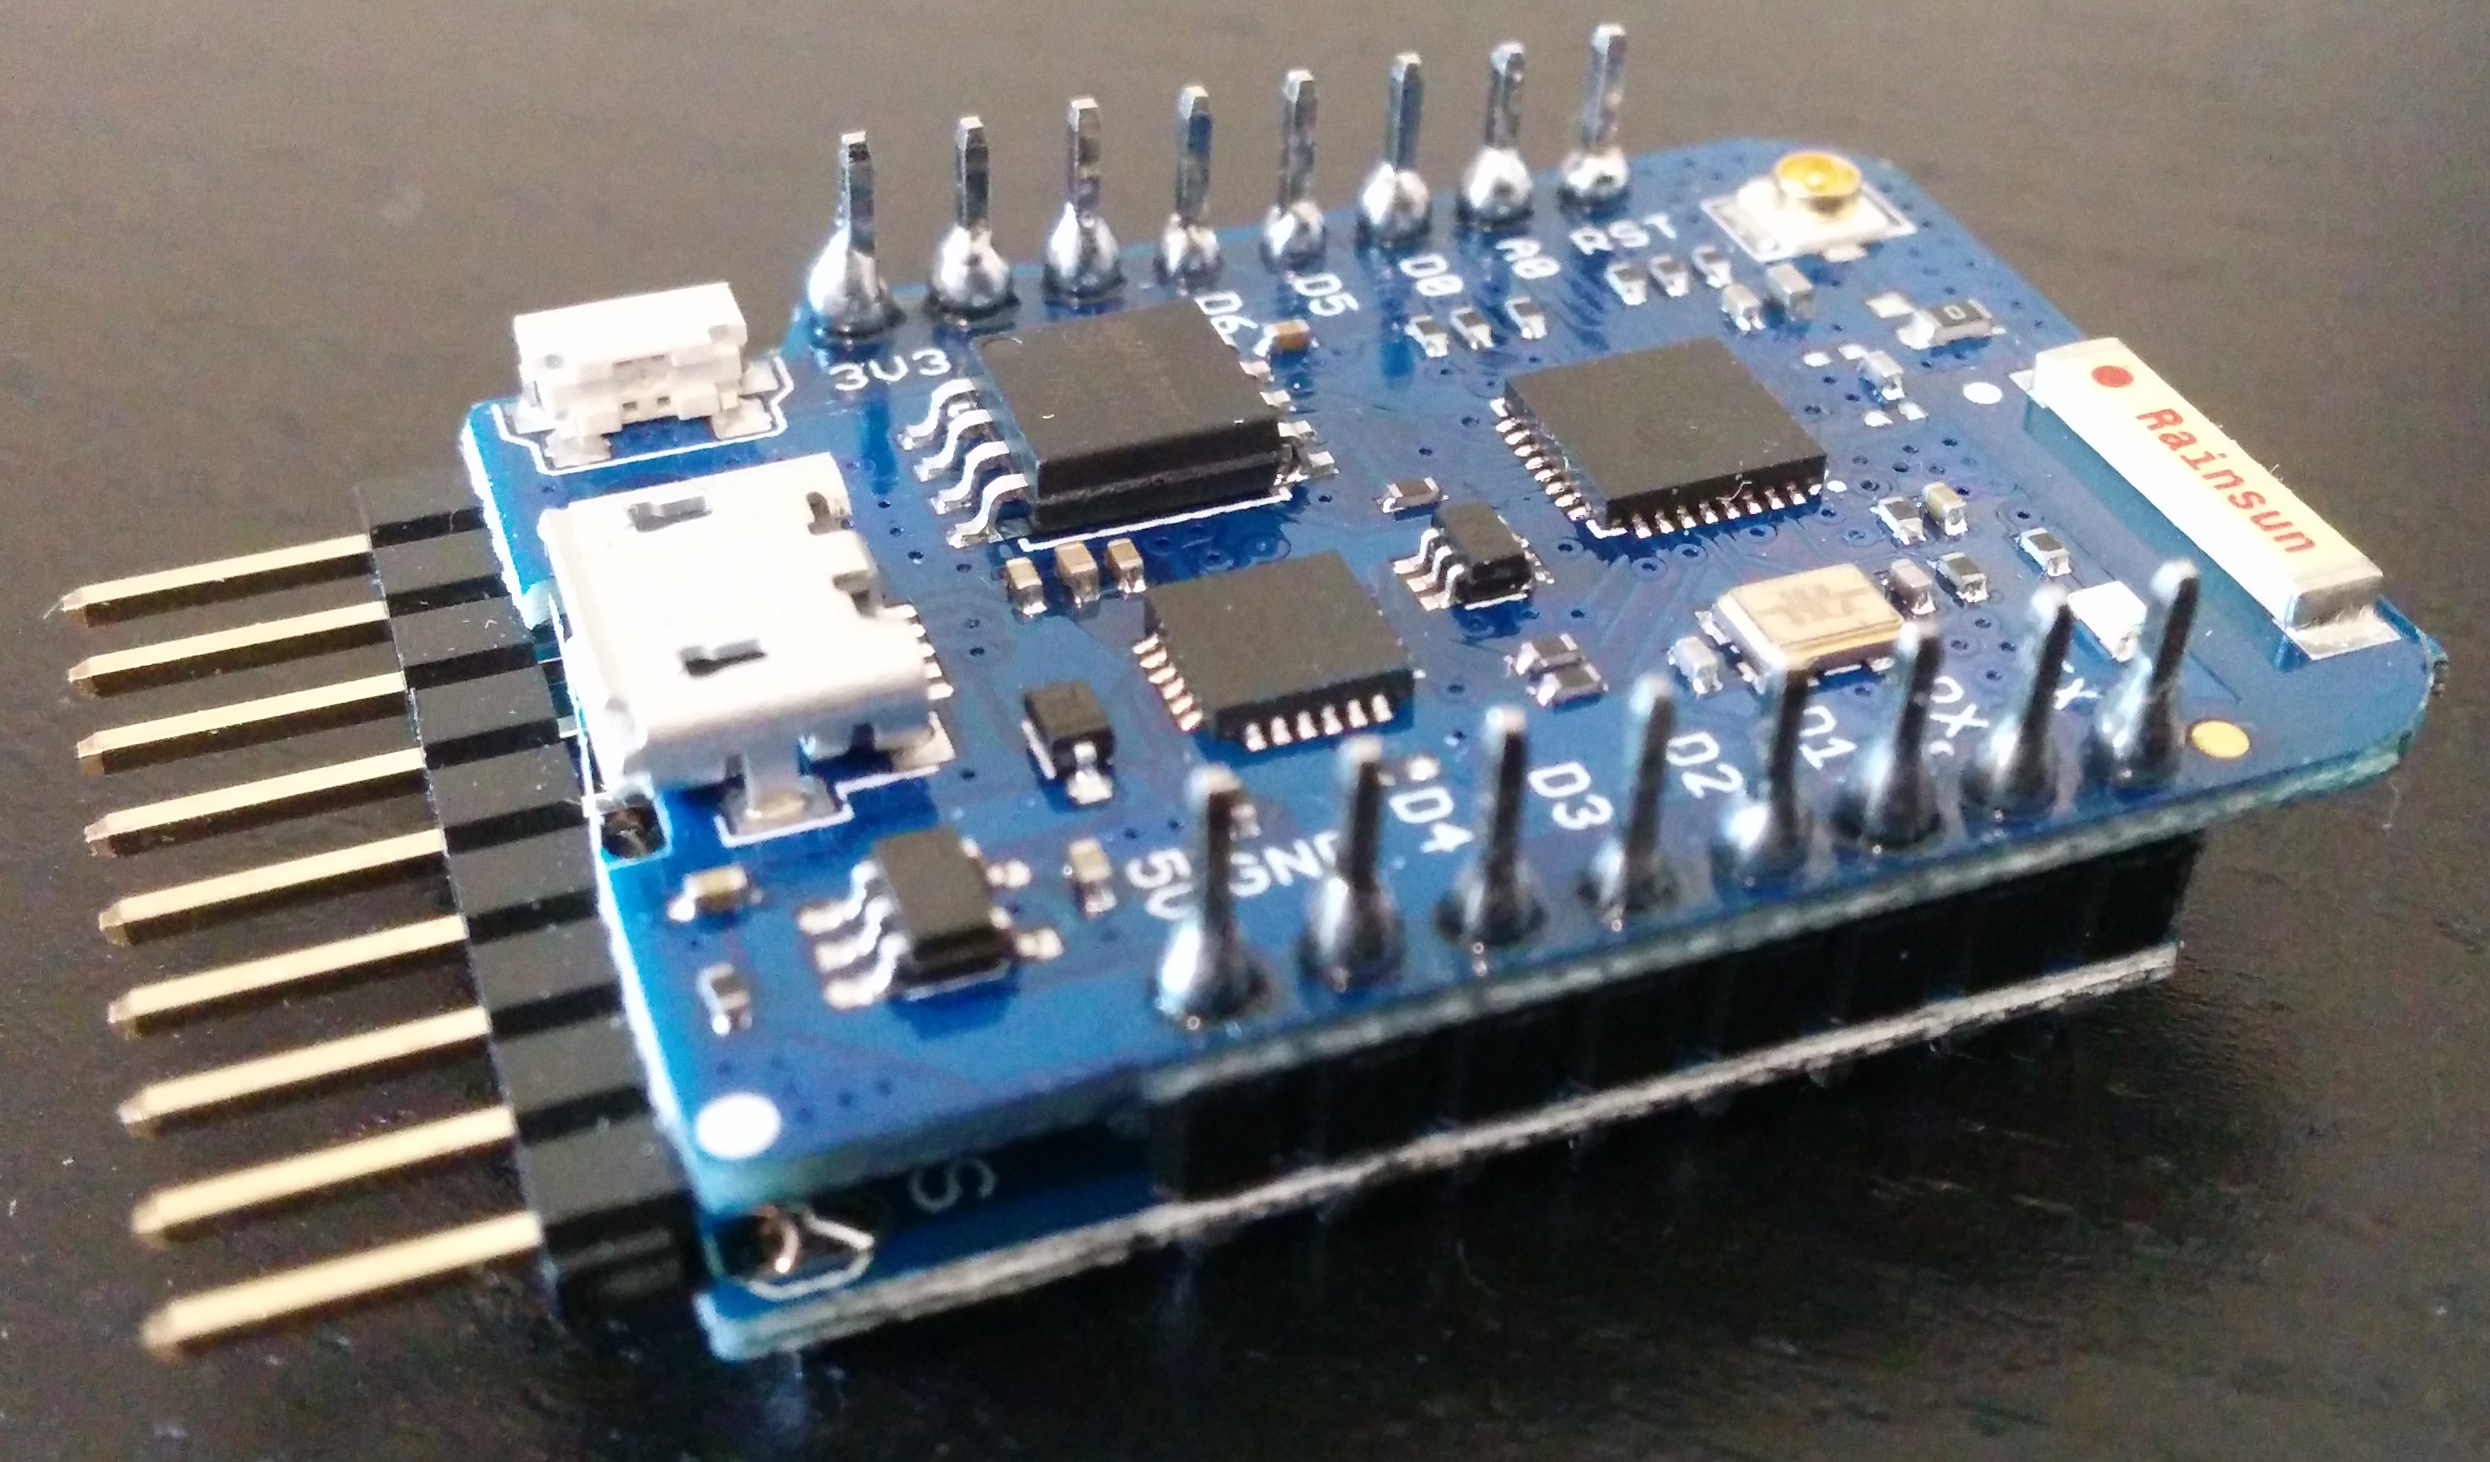
Pins
| Pin (Printed on board) | Function | ESP8266 Pin (GPIO # to use in code) |
|---|---|---|
| TX | TXD | TXD |
| RX | RXD | RXD |
| A0 | Analog input, max 3.3V input | A0 |
| D0 | IO | GPIO16 |
| D1 | IO, SCL | GPIO5 |
| D2 | IO, SDA | GPIO4 |
| D3 | IO, 10k Pull-up | GPIO0 |
| D4 | IO, 10k Pull-up, BUILTIN_LED | GPIO2 |
| D5 | IO, SCK | GPIO14 |
| D6 | IO, MISO | GPIO12 |
| D7 | IO, MOSI | GPIO13 |
| D8 | IO, 10k Pull-down, SS | GPIO15 |
| G | Ground | GND |
| 5V | 5V | - |
| 3V3 | 3.3V | 3.3V |
| RST | Reset | RST |
Introduction
I learned about the ESP8266 chip during a discussion about IOT communication protocol. My argument was that devices would end up communicating over a wired protocol simply because of cost and ease of use for reliable communication. At this point I had only known about the arduino shields (which cost around $50) and other WiFi modules (like the one from Microchip) that were complicated enough it took an EE degree to get the “Hello World” program started. I was introduced to the ESP-01 module (see most modules here) which had a nice firmware that let you off-load all of your WiFi processing on to another chip. I coupled it with a number of PIC chips for a few projects. After that I read about flashing the firmware and running a few things directly on to the chip. I switched over to the ESP-07 and ESP-12 modules. It was wonderful being able to program the chip directly and shrink my project size. It was still difficult to prototype with because the modules didn’t regulators or usb-to-serial chips built in. I started buying and testing all sorts of dev boards and landed on the WeMos D1 mini. It fit well on a bread board. It had everything I needed and nothing more. The price was in the single digits and the quality was great. Since then I’ve tested all of their products and landed on the mini as my favorite. There are a lot of languages and programming methods now supported but I’ve found the easiest for a developer (by day) to be C++ (using the arduino core) and PlatformIO.
Here is an overview of the different boards. I’ve added the LoLin32 for comparison even though it is in a different class. The LoLin32 is the new chip from the same manufacture Espressif that adds in bluetooth support, dual core, and many other features. Most of my projects haven’t needed the extra power (yet) and I haven’t found a great bluetooth tutorial either so I keep picking up a few D1 mini Lites for my new projects.
WeMos boards
| Board | PlatformIO Board | Flash | MCU | Speed | Ram | Weight | Thickness | Price | URL | Schematic | Purchase |
|---|---|---|---|---|---|---|---|---|---|---|---|
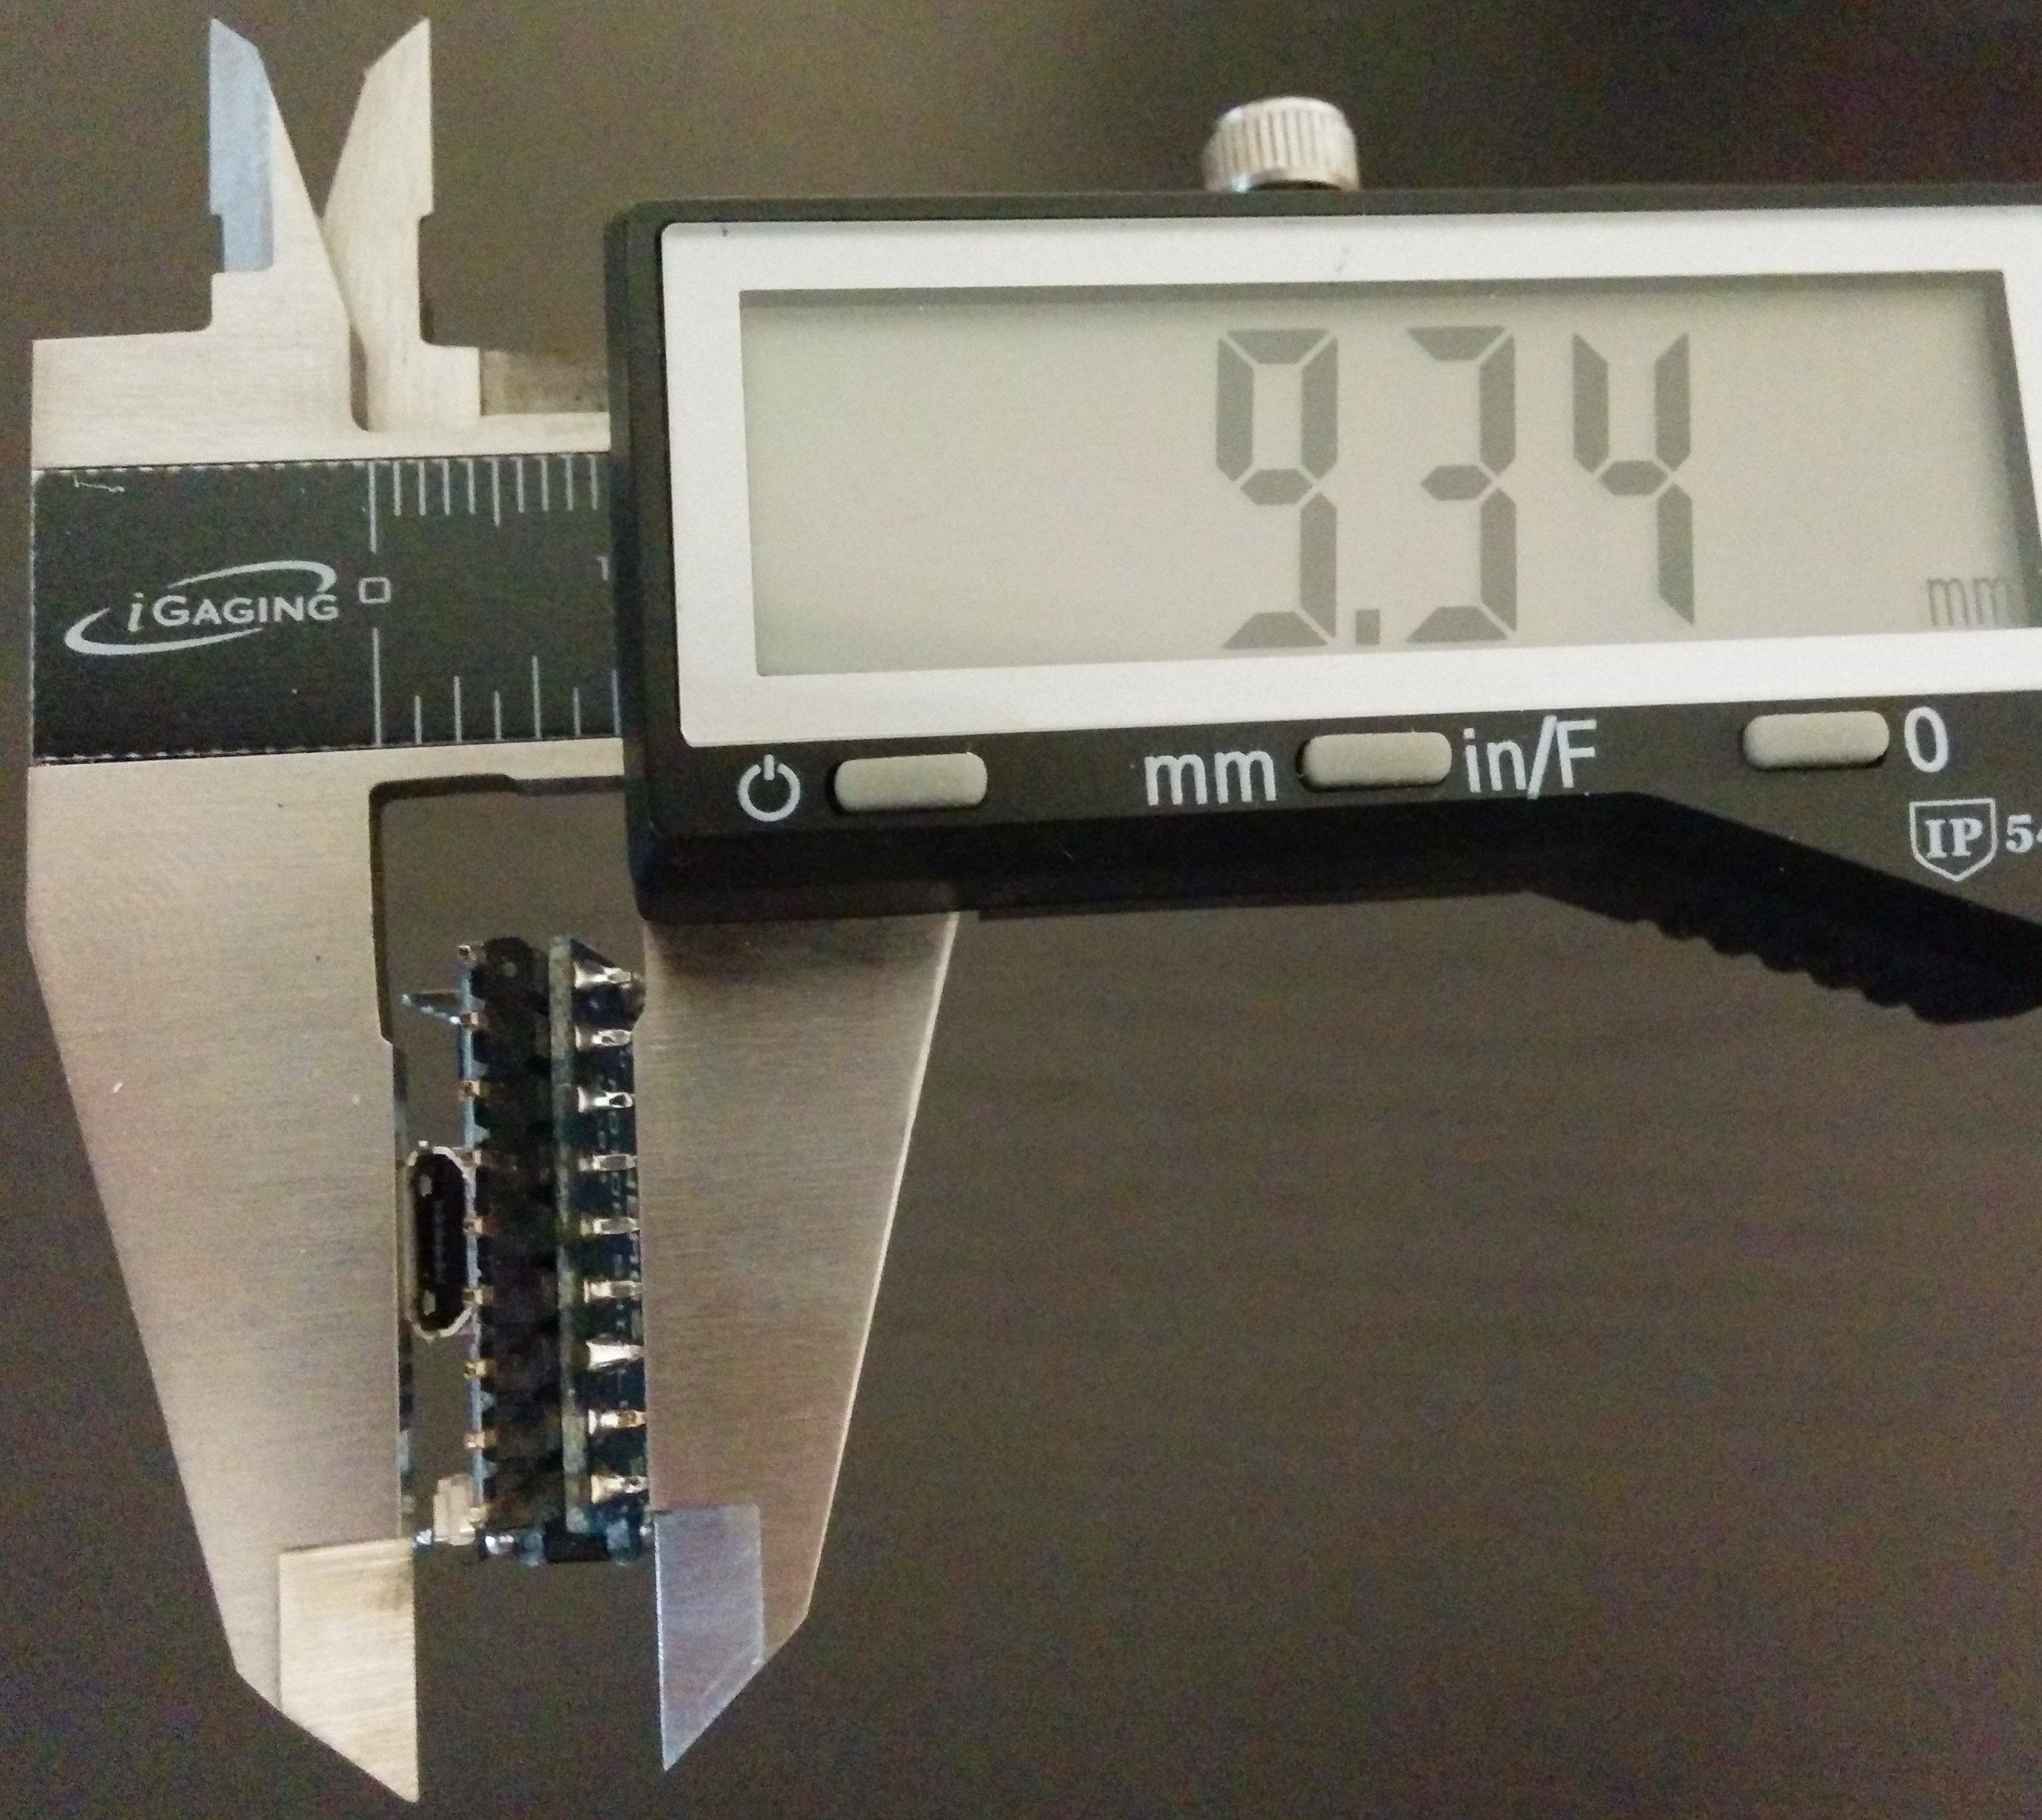
| D1 mini Lite | d1_mini_lite*** | 1MB | ESP8285 | 80Mhz | 80kB | 2.4g** | 3.4mm* | $3.00 | wemos | ? | aliexpress |
| D1 mini | d1_mini | 4MB | ESP8266 | 80Mhz | 80kB | 3.9g | 6.7mm | $4.00 | wemos | schematic | aliexpress |
| D1 mini Pro | d1_mini | 16MB | ESP8266 | 80Mhz | 80kB | 2.5g | 3.6mm | $5.50 | wemos | schematic | aliexpress |
| LoLin32 | lolin32 | 4MB | ESP32 | 240Mhz | 512kB | 5.8g | ? | $6.90 | wemos | schematic | aliexpress |
*measured
**guessed
***Needs an extra file
The form factor of the D1 mini Lite and the D1 mini Pro is smaller since WeMos didn’t use a module. Not having any components on the back side of a board gives me the flexibility to solder shields on do the board with only 2.6mm between them.
Check out this D1 mini Pro mounted directly on a motor shield:
Most of the time I only need a tiny bit of spiffs (on board file system storage) so I can break up my 1M of flash in to about 935kB for user code, 64kB for spiffs, and 20kB for eeprom. To support OTA (over the air updates) you will need enough space in your user code to store a copy of your new firmware so only about half of the 935kB is usable. This leaves about 467kB for most projects. A basic “Hello World” that pulls in the arduino core (and all of the included libraries) is about 223kB and a simple project that connects to WiFi is only about 225kB. Add in a web server and now you are at about 244K. I usually skip the local web server and run everything over mqtt which helps on the storage requirements as well. Running a simple web server and serving up static content is pretty easy so the extra flash space on the D1 mini or D1 mini Pro might be useful for your project.
When I order from AliExpress I usually order directly from the WeMos store. There are knock offs out there now that will save you a few pennies but I like supporting WeMos when I can. Their shipping on everything is about $1.76 and usually arrives between 10 and 30 days.
Install Software
PlatformIO
I’m using a mac for my main development and found brew to be the easiest way to install platformio and keep it updated. Pip is another option.
brew install platformio
And for updates:
brew upgrade platformio
For linux I inspected PlatformIO’s install script and then installed with this command:
python -c "$(curl -fsSL https://raw.githubusercontent.com/platformio/platformio/master/scripts/get-platformio.py)"
For windows or to use another method, see PlatformIO’s installation page: http://docs.platformio.org/en/stable/installation.html
CLion
For my day job I develop in IntelliJ IDEA IDE and I love it! Switching to the Arduino IDE (should it even called an IDE?) even for just a side project made me want to pull my hair out. I tried CLion (also from JetBrains) for C++ development for other MCUs but it didn’t work all that well. It let me write in a familiar environment but many features (like code completion) didn’t work because the IDE didn’t load libraries quite right. In the end, I gave up on CLion with PIC chips and switched back to Microchip’s MPLab IDE which is based off of NetBeans.
PlatformIO helps solve this by bringing in all of the libraries and creating a CLion project file for you. It is a match made in heaven that results in a happy, productive developer. If you aren’t familiar with IntelliJ IDEA or don’t want to pay for CLion, I would give the PlatformIO IDE a try.
Install CLion (Trial) https://www.jetbrains.com/clion/
Driver for CH340G or CP2104
On linux I only build the binaries so I wouldn’t be able to provide the best driver recommendations. Just make sure you get the right driver to match your usb-to-serial chip. For the mac, make sure you get recent driver. Older drivers can cause a kernel panic on Sierra.
The D1 mini and D1 mini Lite use the CH340G usb-to-serial chip
Free driver: http://blog.sengotta.net/wp-content/uploads/2015/11/CH341SER_MAC-1.4.zip
Paid driver: https://www.mac-usb-serial.com/
The D1 mini Pro and LoLin32 uses the CP2104 usb-to-serial chip
https://www.silabs.com/products/development-tools/software/usb-to-uart-bridge-vcp-drivers
Don’t forget to restart your machine if the driver installation requires it.
Set up the Project
mkdir project
cd project
platformio init --ide clion --board d1_mini
touch src/main.cpp
Notice that the main file is a cpp and not a ino file. There are a few small differences. The main difference is that we need to include the arduino.h header in our main file.
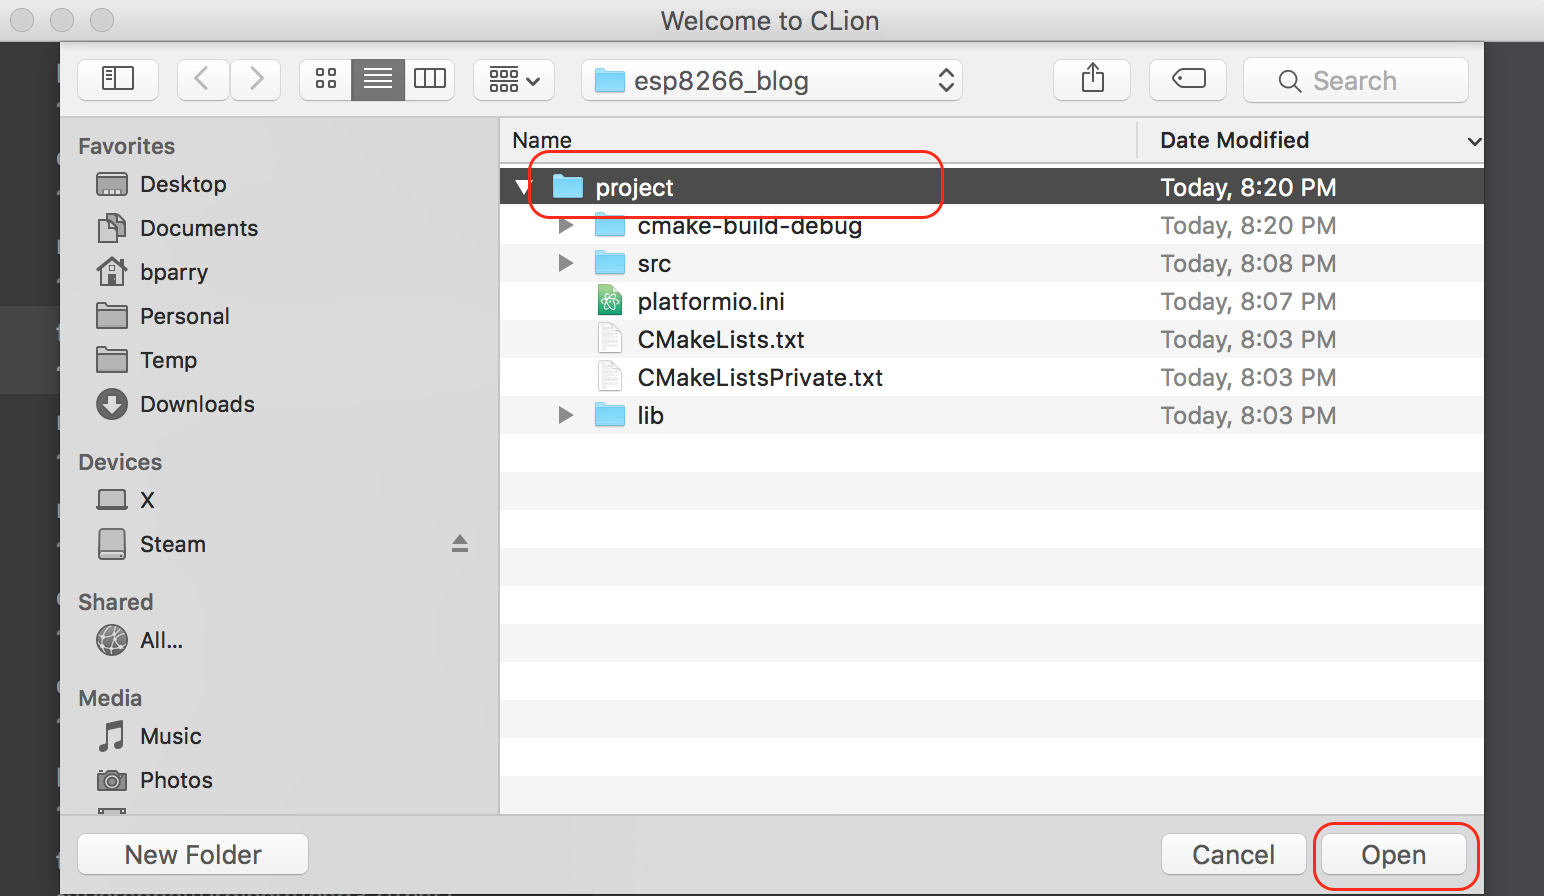
Now, let’s open CLion and then “File” -> “Open” the project’s root folder. When you don’t have any projects open you can use the “Open Project” button from CLion’s welcome screen.
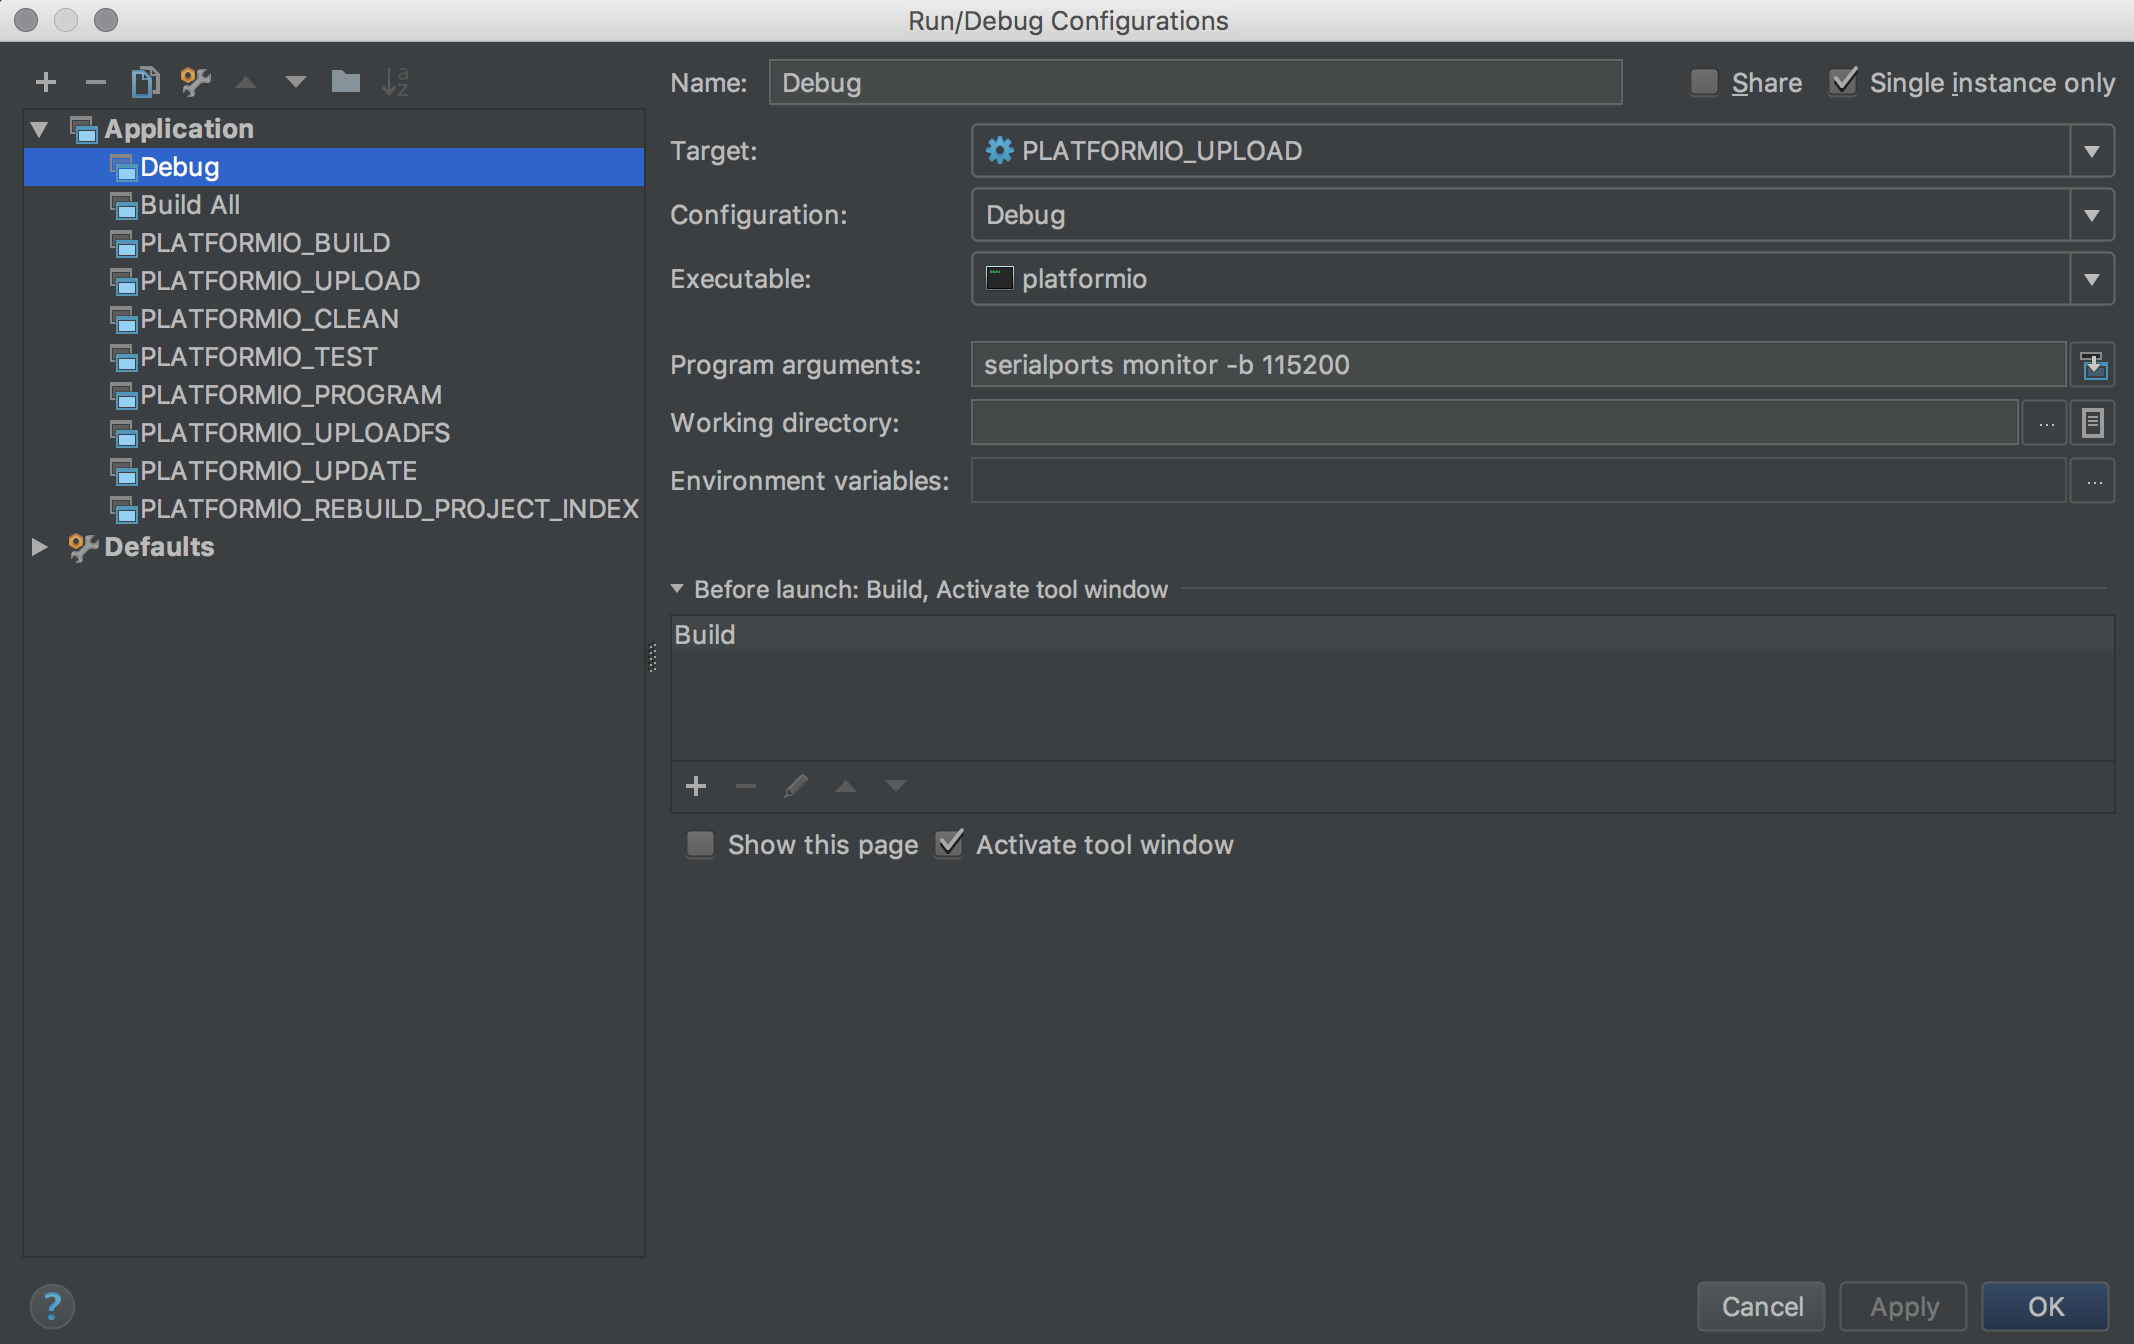
The default run configurations are almost ideal. I usually modify the PLATFORMIO_UPLOAD configuration to look like this:
Name: Debug
Single instance only: checked
Target: PLATFORMIO_UPLOAD
Executable: /usr/local/bin/platformio
Program arguments: serialports monitor -b 115200
You may need to use the keyboard shortcut command + shift + . to see the /usr folder when you are browsing your drive.
To save a few clicks, here is a little sed script that can insert the build config in to the CLion workspace.xml:
sed -i -e'/<component name="RunManager"/a <configuration default="false" name="Debug" type="CMakeRunConfiguration" factoryName="Application" singleton="true" PROGRAM_PARAMS="serialports monitor -b 115200" PASS_PARENT_ENVS_2="true" PROJECT_NAME="project" TARGET_NAME="PLATFORMIO_UPLOAD" CONFIG_NAME="Debug" RUN_PATH="/usr/local/bin/platformio">\n <envs />\n <method />\n </configuration>' .idea/workspace.xml
The build stage builds and uploads your firmware to your device and then run stage starts a debugger to monitor Serial.print of your device.
Now you can use CLion’s Run  , Rerun
  , and Stop
  just like you would with any other program.
If you don’t want to create a “Debug” run configuration and prefer to use the PlatformIO defaults, make sure you use the build button instead of the run button: 
Examples
Example - Blinky
This first example is a basic “Hello World” program. If you are using the debug method there is a race condition between the ESP8266 starting up and the “platformio serialports monitor” command. We add in a delay to give our computer time to connect so we don’t miss any messages.
src/main.cpp
#include <Arduino.h>

void setup() {
    Serial.begin(115200);
    delay(1000);
    pinMode(LED_BUILTIN, OUTPUT);
    Serial.println("STARTING!");
}

void loop() {
    Serial.println("LED: ON (LOW)");
    digitalWrite(LED_BUILTIN, LOW);
    delay(1000);

    Serial.println("LED: OFF (HIGH)");
    digitalWrite(LED_BUILTIN, HIGH);
    delay(1000);
}
/usr/local/bin/platformio serialports monitor -b 115200
--- Miniterm on /dev/cu.wchusbserial1410  115200,8,N,1 ---
--- Quit: Ctrl+C | Menu: Ctrl+T | Help: Ctrl+T followed by Ctrl+H ---
STARTING!
LED: ON
LED: OFF
LED: ON
LED: OFF
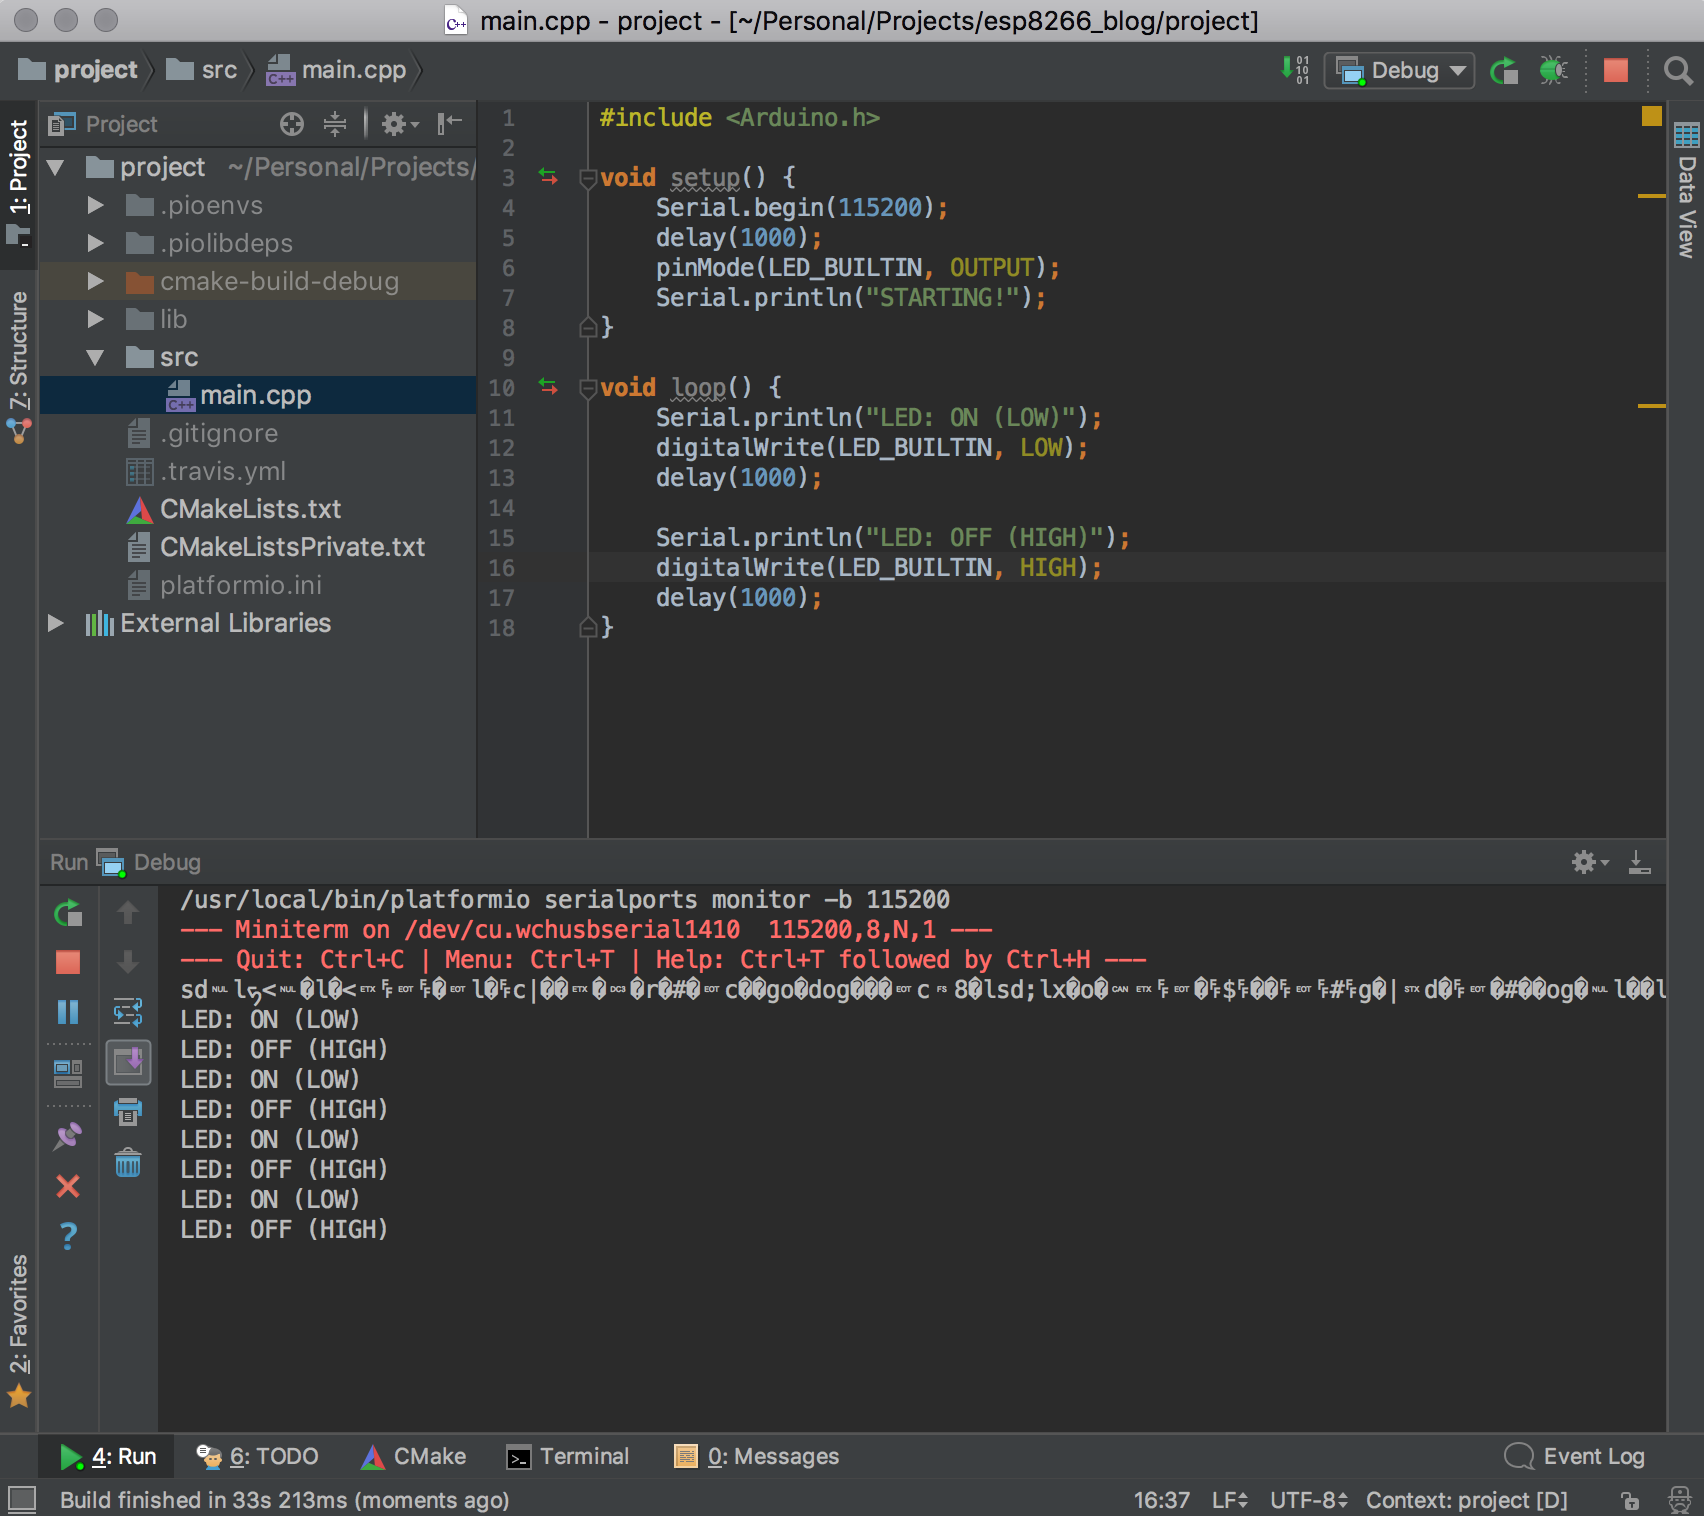
Note that I was able to connect quick enough to see the ESP8266 garbage in my debug output. The “STARTING!” string is at the end of the line.
Example - WiFi
Now let’s get connected to WiFi. There are loads of basic examples that put the WiFi connect code in setup(), but my preferred way to manage WiFi is to set up the client in the setup() and then check for status in your loop().
Notice that avoid declaring my function signatures by defining the function before it is used. This isn’t always possible in all projects. I don’t think declaring functions is required in Adruino .ino sketch files. (This is another difference between .ino and .cpp source files)
src/main.cpp
#include <Arduino.h>
#include <ESP8266WiFi.h>

#define WIFI_SSID "your ssid"
#define WIFI_PASSWORD "your secure wifi password"

void setup() {
    Serial.begin(115200);
    delay(1000);
    pinMode(LED_BUILTIN, OUTPUT);
    Serial.println("STARTING!");

    WiFi.begin(WIFI_SSID, WIFI_PASSWORD);
    WiFi.setAutoReconnect(true);
}

const char* getWiFiStatusString(wl_status_t status) {
    switch (status) {
        case WL_NO_SHIELD: return "NO_SHIELD";
        case WL_IDLE_STATUS: return "IDLE_STATUS";
        case WL_NO_SSID_AVAIL: return "NO_SSID_AVAIL";
        case WL_SCAN_COMPLETED: return "SCAN_COMPLETED";
        case WL_CONNECTED: return "CONNECTED";
        case WL_CONNECT_FAILED: return "CONNECT_FAILED";
        case WL_CONNECTION_LOST: return "CONNECTION_LOST";
        case WL_DISCONNECTED: return "DISCONNECTED";
    }
    return "UNKNOWN";
}

wl_status_t wifiStatus = WL_IDLE_STATUS;

void handleWiFiConnect() {
    Serial.println("[WIFI] Connected");
    Serial.print("[WIFI] IP: ");
    Serial.println(WiFi.localIP());
}

void handleWiFiDisconnect() {
    Serial.println("[WIFI] Disconnected");
}

void handleWiFiChange(wl_status_t oldStatus, wl_status_t newStatus) {
    Serial.print("[WIFI] State: ");
    Serial.print(getWiFiStatusString(oldStatus));
    Serial.print(" -> ");
    Serial.println(getWiFiStatusString(newStatus));
}

void loop() {
    wl_status_t newWiFiStatus = WiFi.status();
    if (wifiStatus != newWiFiStatus) {
        wl_status_t oldWiFiStatus = wifiStatus;
        wifiStatus = newWiFiStatus;
        handleWiFiChange(oldWiFiStatus, newWiFiStatus);
        if (newWiFiStatus == WL_CONNECTED)
            handleWiFiConnect();
        if (oldWiFiStatus == WL_CONNECTED)
            handleWiFiDisconnect();
    }

    int delayTimeInms = 1000;
    if (!WiFi.isConnected())
        delayTimeInms = 100;

    Serial.println("[LED] State: ON (LOW)");
    digitalWrite(LED_BUILTIN, LOW);
    delay(delayTimeInms);

    Serial.println("[LED] State: OFF (HIGH)");
    digitalWrite(LED_BUILTIN, HIGH);
    delay(delayTimeInms);
}
/usr/local/bin/platformio serialports monitor -b 115200
--- Miniterm on /dev/cu.SLAB_USBtoUART  115200,8,N,1 ---
--- Quit: Ctrl+C | Menu: Ctrl+T | Help: Ctrl+T followed by Ctrl+H ---
STARTING!
[WIFI] State: IDLE_STATUS -> DISCONNECTED
[LED] State: ON (LOW)
[LED] State: OFF (HIGH)
[LED] State: ON (LOW)
[LED] State: OFF (HIGH)
[LED] State: ON (LOW)
[LED] State: OFF (HIGH)
[LED] State: ON (LOW)
[LED] State: OFF (HIGH)
[LED] State: ON (LOW)
[LED] State: OFF (HIGH)
[WIFI] State: DISCONNECTED -> CONNECTED
[WIFI] Connected
[WIFI] IP: 10.0.9.99
[LED] State: ON (LOW)
[LED] State: OFF (HIGH)
[LED] State: ON (LOW)
Example - WiFi Manager
Many of our projects will have WiFi and we want to make our code modular and reusable (and because object-oriented programming is cool right now), let’s break out our WiFi code in to a WiFiManager class.
When you create new files CLion won’t recognize them until you reload your project. To do this: Click the “CMake” tab at the bottom and then click “Reload CMake Project”.

src/main.cpp
#include <Arduino.h>
#include "WiFiManager.h"

#define WIFI_SSID "your neighbor's ssid"
#define WIFI_PASSWORD "your neighbor's phone number"

WiFiManager wifi(WIFI_SSID, WIFI_PASSWORD);

void setup() {
    Serial.begin(115200);
    delay(1000);
    pinMode(LED_BUILTIN, OUTPUT);
    Serial.println("STARTING!");
    wifi.setup();
}

void loop() {
    wifi.loop();

    int delayTimeInms = 1000;
    if (!wifi.isConnected())
        delayTimeInms = 50;

    Serial.println("[LED] State: ON (LOW)");
    digitalWrite(LED_BUILTIN, LOW);
    delay(delayTimeInms);

    Serial.println("[LED] State: OFF (HIGH)");
    digitalWrite(LED_BUILTIN, HIGH);
    delay(delayTimeInms);
}
src/WiFiManager.h
#ifndef PROJECT_WIFIMANAGER_H
#define PROJECT_WIFIMANAGER_H

#include <ESP8266WiFi.h>

class WiFiManager {
public:
    WiFiManager(const char* newSsid, const char* password);
    void setup();
    void loop();
    bool isConnected();

private:
    const char* ssid;
    const char* password;
    wl_status_t status;
    const char *getStatusString(wl_status_t status);
    void handleConnect();
    void handleDisconnect();
    void handleStatusChange(wl_status_t oldStatus, wl_status_t newStatus);
};


#endif //PROJECT_WIFIMANAGER_H
src/WiFiManager.cpp
#include "WiFiManager.h"

WiFiManager::WiFiManager(const char* ssid, const char* password) {
    this->ssid = ssid;
    this->password = password;
    this->status = WL_IDLE_STATUS;
}

const char* WiFiManager::getStatusString(wl_status_t status) {
    switch (status) {
        case WL_NO_SHIELD: return "NO_SHIELD";
        case WL_IDLE_STATUS: return "IDLE_STATUS";
        case WL_NO_SSID_AVAIL: return "NO_SSID_AVAIL";
        case WL_SCAN_COMPLETED: return "SCAN_COMPLETED";
        case WL_CONNECTED: return "CONNECTED";
        case WL_CONNECT_FAILED: return "CONNECT_FAILED";
        case WL_CONNECTION_LOST: return "CONNECTION_LOST";
        case WL_DISCONNECTED: return "DISCONNECTED";
    }
    return "UNKNOWN";
}

void WiFiManager::handleConnect() {
    Serial.println("[WiFiManager] Connected");
    Serial.print("[WiFiManager] IP: ");
    Serial.println(WiFi.localIP());
}

void WiFiManager::handleDisconnect() {
    Serial.println("[WiFiManager] Disconnected");
}

void WiFiManager::handleStatusChange(wl_status_t oldStatus, wl_status_t newStatus) {
    Serial.print("[WiFiManager] State: ");
    Serial.print(getStatusString(oldStatus));
    Serial.print(" -> ");
    Serial.println(getStatusString(newStatus));
}

void WiFiManager::setup() {
    WiFi.begin(ssid, password);
    WiFi.setAutoReconnect(true);
}

void WiFiManager::loop() {
    wl_status_t newWiFiStatus = WiFi.status();
    if (status != newWiFiStatus) {
        wl_status_t oldWiFiStatus = status;
        status = newWiFiStatus;
        handleStatusChange(oldWiFiStatus, newWiFiStatus);
        if (newWiFiStatus == WL_CONNECTED)
            handleConnect();
        if (oldWiFiStatus == WL_CONNECTED)
            handleDisconnect();
    }
}

bool WiFiManager::isConnected() {
    WiFi.isConnected();
}
/usr/local/bin/platformio serialports monitor -b 115200
--- Miniterm on /dev/cu.SLAB_USBtoUART  115200,8,N,1 ---
--- Quit: Ctrl+C | Menu: Ctrl+T | Help: Ctrl+T followed by Ctrl+H ---
STARTING!
[WiFiManager] State: IDLE_STATUS -> DISCONNECTED
[LED] State: ON (LOW)
[LED] State: OFF (HIGH)
[LED] State: ON (LOW)
[LED] State: OFF (HIGH)
[LED] State: ON (LOW)
[LED] State: OFF (HIGH)
[LED] State: ON (LOW)
[LED] State: OFF (HIGH)
[LED] State: ON (LOW)
[LED] State: OFF (HIGH)
[LED] State: ON (LOW)
[LED] State: OFF (HIGH)
[LED] State: ON (LOW)
[LED] State: OFF (HIGH)
[LED] State: ON (LOW)
[LED] State: OFF (HIGH)
[LED] State: ON (LOW)
[LED] State: OFF (HIGH)
[WiFiManager] State: DISCONNECTED -> CONNECTED
[WiFiManager] Connected
[WiFiManager] IP: 10.0.9.99
[LED] State: ON (LOW)
[LED] State: OFF (HIGH)
[LED] State: ON (LOW)
[LED] State: OFF (HIGH)
Example - WiFi Manager with Lambda
Who doesn’t enjoy using lambdas in C? Let’s upgrade our WiFi Manager to use callbacks.
src/main.cpp
#include <Arduino.h>
#include "WiFiManager.h"

#define WIFI_SSID "the other neighbor's ssid"
#define WIFI_PASSWORD "1234567890"

WiFiManager wifi(WIFI_SSID, WIFI_PASSWORD);

int delayTimeInms = 1000;

void setup() {
    Serial.begin(115200);
    delay(1000);
    pinMode(LED_BUILTIN, OUTPUT);
    Serial.println("STARTING!");

    wifi.onConnect([&](){ //Be sure to use & to capture the variables by reference
        delayTimeInms = 10000;
    });
    wifi.onDisconnect([&delayTimeInms](){ //You could also capture single variables
        delayTimeInms = 100;
    });
    wifi.onError([&](){
        delayTimeInms = 50;
    });
    wifi.setup();
}

void loop() {
    wifi.loop();

    digitalWrite(LED_BUILTIN, LOW);
    delay(delayTimeInms);

    digitalWrite(LED_BUILTIN, HIGH);
    delay(delayTimeInms);
}
src/WiFiManager.h
#ifndef PROJECT_WIFIMANAGER_H
#define PROJECT_WIFIMANAGER_H

#include <ESP8266WiFi.h>

class WiFiManager {
public:
    WiFiManager(const char* newSsid, const char* password);
    void onConnect(std::function<void()>);
    void onDisconnect(std::function<void()>);
    void onError(std::function<void()>);
    void setup();
    void loop();
    bool isConnected();

private:
    const char* ssid;
    const char* password;
    wl_status_t status;
    std::function<void()> onConnectHandler;
    std::function<void()> onDisconnectHandler;
    std::function<void()> onErrorHandler;
    const char *getStatusString(wl_status_t status);
    void handleConnect();
    void handleDisconnect();
    void handleError();
    void handleStatusChange(wl_status_t oldStatus, wl_status_t newStatus);
};


#endif //PROJECT_WIFIMANAGER_H
src/WiFiManager.cpp
#include "WiFiManager.h"

WiFiManager::WiFiManager(const char* ssid, const char* password) {
    this->ssid = ssid;
    this->password = password;
    this->status = WL_IDLE_STATUS;
}

void WiFiManager::onConnect(std::function<void()> onConnectHandler) {
    this->onConnectHandler = onConnectHandler;
}

void WiFiManager::onDisconnect(std::function<void()> onDisconnectHandler) {
    this->onDisconnectHandler = onDisconnectHandler;
}

void WiFiManager::onError(std::function<void()> onErrorHandler) {
    this->onErrorHandler = onErrorHandler;
}

const char* WiFiManager::getStatusString(wl_status_t status) {
    switch (status) {
        case WL_NO_SHIELD: return "NO_SHIELD";
        case WL_IDLE_STATUS: return "IDLE_STATUS";
        case WL_NO_SSID_AVAIL: return "NO_SSID_AVAIL";
        case WL_SCAN_COMPLETED: return "SCAN_COMPLETED";
        case WL_CONNECTED: return "CONNECTED";
        case WL_CONNECT_FAILED: return "CONNECT_FAILED";
        case WL_CONNECTION_LOST: return "CONNECTION_LOST";
        case WL_DISCONNECTED: return "DISCONNECTED";
    }
    return "UNKNOWN";
}

void WiFiManager::handleConnect() {
    Serial.println("[WiFiManager] Connected");
    Serial.print("[WiFiManager] IP: ");
    Serial.println(WiFi.localIP());

    if (onConnectHandler)
        onConnectHandler();
}

void WiFiManager::handleDisconnect() {
    Serial.println("[WiFiManager] Disconnected");

    if (onDisconnectHandler)
        onDisconnectHandler();
}

void WiFiManager::handleError() {
    Serial.println("[WiFiManager] Error");

    if (onErrorHandler)
        onErrorHandler();
}

void WiFiManager::handleStatusChange(wl_status_t oldStatus, wl_status_t newStatus) {
    Serial.print("[WiFiManager] State: ");
    Serial.print(getStatusString(oldStatus));
    Serial.print(" -> ");
    Serial.println(getStatusString(newStatus));
}

void WiFiManager::setup() {
    WiFi.begin(ssid, password);
    WiFi.setAutoReconnect(true);
}

void WiFiManager::loop() {
    wl_status_t newWiFiStatus = WiFi.status();
    if (status != newWiFiStatus) {
        wl_status_t oldWiFiStatus = status;
        status = newWiFiStatus;
        handleStatusChange(oldWiFiStatus, newWiFiStatus);
        if (newWiFiStatus == WL_CONNECTED)
            handleConnect();
        if (oldWiFiStatus == WL_CONNECTED)
            handleDisconnect();
        if (newWiFiStatus == WL_NO_SHIELD || newWiFiStatus == WL_NO_SSID_AVAIL || newWiFiStatus == WL_CONNECT_FAILED)
            handleError();
    }
}

bool WiFiManager::isConnected() {
    WiFi.isConnected();
}
Example - Web Server
Our favorite web server is the async one from me-no-dev.
I would read through his pages to see what this amazing library can do.
To find the library through platformio’s command line:
$ platformio lib search ESPAsyncWebServer
Found 1 libraries:

ESPAsyncWebServer
=================
#ID: 306
Asynchronous HTTP and WebSocket Server Library for ESP8266 and ESP32

Keywords: async, websocket, http, webserver
Compatible frameworks: Arduino
Compatible platforms: Espressif 8266
Authors: Hristo Gochkov

$
Or find libraries through the online search: http://platformio.org/lib/search?query=ESPAsyncWebServer
Note that the name is “ESPAsyncWebServer” and the ID is 306.
We can add this to our project by adding “lib_deps = ESPAsyncWebServer” or “lib_deps = 306” to our platformio.ini file. Now it might look something like this:
; PlatformIO Project Configuration File
;
;   Build options: build flags, source filter
;   Upload options: custom upload port, speed and extra flags
;   Library options: dependencies, extra library storages
;   Advanced options: extra scripting
;
; Please visit documentation for the other options and examples
; http://docs.platformio.org/page/projectconf.html

[env:d1_mini]
platform = espressif8266
board = d1_mini
framework = arduino
lib_deps = ESPAsyncWebServer
You should see it download the next time you program your device.
So that CLion will see the new library you will need to “Build” the “PLATFORMIO_REBUILD_PROJECT_INDEX” configuration and then click “Yes” to relaod the project. Once the project is reloaded, you will lose your custom project configurations (like the Debug configuration we added). This is kind of a pain, but code completion with 3rd party libraries is LIFE CHANGING!
src/WiFiManager.h and src/WiFiManager.cpp haven’t changed
src/main.cpp
#include <Arduino.h>
#include "WiFiManager.h"
#include <Hash.h> //Required for ESPAsyncWebServer.h
#include <ESPAsyncWebServer.h>


#define WIFI_SSID "default ssid"
#define WIFI_PASSWORD "random default password"

WiFiManager wifi(WIFI_SSID, WIFI_PASSWORD);

int delayTimeInms = 50;

AsyncWebServer server(80);


void setup() {
    Serial.begin(115200);
    delay(1000);
    pinMode(LED_BUILTIN, OUTPUT);
    Serial.println("STARTING!");

    wifi.onConnect([&](){ //Be sure to use & to capture the variables by reference
        delayTimeInms = 1000;
    });
    wifi.onDisconnect([&delayTimeInms](){ //You could also capture single variables
        delayTimeInms = 50;
    });
    wifi.onError([&](){
        delayTimeInms = 10000;
    });
    wifi.setup();

    server.on("/heap", HTTP_GET, [](AsyncWebServerRequest *request){
        Serial.println("[HTTPServer] Received GET /heap");
        request->send(200, "text/plain", String(ESP.getFreeHeap()));
    });

    server.on("/set", HTTP_GET, [&](AsyncWebServerRequest *request){
        Serial.println("[HTTPServer] Received GET /set");
        AsyncWebParameter* delayTimeInmsParameter = request->getParam("delayTimeInms");
        if (delayTimeInmsParameter) {
            delayTimeInms = delayTimeInmsParameter->value().toInt();
            request->send(200, "text/plain", "OK");
        }
        else {
            request->send(200, "text/plain", "ERROR");
        }
    });

    server.begin();
}

void loop() {
    wifi.loop();

    digitalWrite(LED_BUILTIN, LOW);
    delay(delayTimeInms);

    digitalWrite(LED_BUILTIN, HIGH);
    delay(delayTimeInms);
}
Conclusion
If you don’t want to build your own WiFiManager, try https://github.com/tzapu/WiFiManager
Good luck!
I’ll try to figure out how to add comments to a blog.